
Dash: Configurable dcc.Interval
As I mentioned in my blog post about building a Real-Time Crypto Dashboard, I’ve recently been working with the Dash low-code framework for building interactive data apps.
I was using the dcc.Interval component to automatically refresh components on the page and wanted to make the refresh interval configurable.
In this blog post we’ll learn how to do that.
Setup
Let’s first setup our Python environment:
python -m venv .env
source .env/bin/activate
And install the dash library:
pip install dashBuilding a refreshing dashboard
Now we’re going to build a simple dashboard that refreshes a timestamp on the page once every 1,000 milliseconds i.e. once per second. The code to do this is shown below:
import datetime
from dash import Dash, html, dcc, Input, Output

app = Dash(__name__)
app.layout = html.Div([
    html.Div(id='latest-timestamp', style={"padding": "20px"}),
    dcc.Interval(
            id='interval-component',
            interval=1 * 1000,
            n_intervals=0
    ),
])

@app.callback(
    [Output(component_id='latest-timestamp', component_property='children')],
    [Input('interval-component', 'n_intervals')]
)
def update_timestamp(interval):
    return [html.Span(f"Last updated: {datetime.datetime.now()}")]

if __name__ == '__main__':
    app.run_server(debug=True)
python dashboard.pyIf we navigate to http://localhost:8050, we’ll see the timestamp updating once per second, as shown in the following animation:

The timestamp updates once every second, just as we’d expect.
To make this value configurable we will use dcc.Slider to set the new refresh rate and we’ll add a new callback that updates the refresh interval.
import datetime
from dash import Dash, html, dcc, Input, Output
app = Dash(__name__)
app.layout = html.Div([
html.Div(children=[
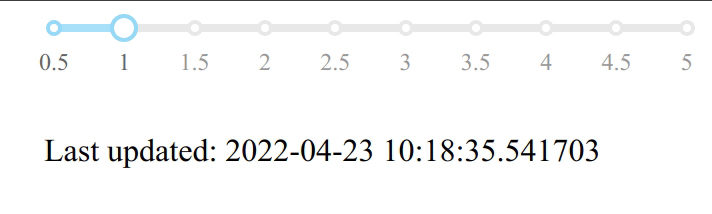
dcc.Slider(min=0.5, max=5, step=0.5, value=1, id='interval-refresh'), (1)
], style={'width': '20%'}),
html.Div(id='latest-timestamp', style={"padding": "20px"}),
dcc.Interval(
id='interval-component',
interval=1 * 1000,
n_intervals=0
),
])
@app.callback(
[Output(component_id='interval-component', component_property='interval')],
[Input('interval-refresh', 'value')])
def update_refresh_rate(value):
return [value * 1000] (2)
@app.callback(
[Output(component_id='latest-timestamp', component_property='children')],
[Input('interval-component', 'n_intervals')]
)
def update_timestamp(interval):
return [html.Span(f"Last updated: {datetime.datetime.now()}")]
if __name__ == '__main__':
app.run_server(debug=True)| 1 | dcc.Slider lets us configure a new refresh rate |
| 2 | This callback updates the value of interval-component |
Now if we navigate back to our web browser, we can adjust the interval to be whatever we like:
About the author
I'm currently working on short form content at ClickHouse. I publish short 5 minute videos showing how to solve data problems on YouTube @LearnDataWithMark. I previously worked on graph analytics at Neo4j, where I also co-authored the O'Reilly Graph Algorithms Book with Amy Hodler.